|
Back to Blog
 Music is a powerful tool for nurturing creativity, discipline, and cognitive development in children. To ensure a fulfilling musical journey for your child, setting realistic goals is key. In this guide, we will explore the significance of goal-setting in music education and provide practical tips on how to measure and celebrate your child's progress. Why Set Goals in Music Lessons?Setting goals in music lessons offers a myriad of benefits for young learners. It instills a sense of achievement, fosters motivation, and provides a roadmap for improvement. As parents, understanding the value of goal-setting can profoundly impact your child's musical experience. Understanding Your Child's Musical Interests and Abilities:Before embarking on goal-setting, it's crucial to understand your child's musical preferences and strengths. Tailoring goals to align with their interests ensures a more engaging and enjoyable learning experience. Setting Specific and Achievable Goals:Work with your child's music teacher to establish objectives or learning goals for your child's musical development. Break down larger musical objectives into smaller, achievable milestones. For example, rather than a broad goal like "learn a music piece," set specific targets like "mastering the first verse by the end of the week." Monitoring and Adjusting Goals:Regularly check in on your child's progress and be ready to adjust goals accordingly. Recognize when a goal needs modification and maintain open communication with your child's music teacher to align home and lesson goals for a cohesive learning experience. Encouraging Practice and Consistency:Establishing a conducive practice environment at home is essential. Encourage consistent practice by making sessions enjoyable and rewarding. For instance, incorporate playtime after the practice session.  Celebrating Milestones:Celebrate both small and big milestones, reinforcing the idea that each step forward is a significant accomplishment in the musical journey. Beyond material rewards, consider offering positive feedback, encouragement to celebrate children's achievements in music, fostering intrinsic motivation and a positive learning environment. Explore opportunities for your child to showcase their progress through musical performances at home or within the community.  In the symphony of your child's musical journey, setting realistic goals acts as the conductor, guiding the melody of growth and accomplishment. Stay actively involved, provide support, and adapt as needed to ensure a fulfilling learning experience for your child.
If you already have children learning music, we would love to hear about your experiences in setting and achieving musical goals with them!
Back to Blog
ABRSM 2023 & 2024 - Grade 8 Piano - A:2 First movement of Mozart’s Sonata in F major, K 3325/26/2023 Mozart's well-known piano sonata in F major is an exciting and fun piece to play! If you are interested in mastering the piece for your Grade 8 examination or simply for fun, you can watch the video below! In this video, Ms. Shu Wen will give you a breakdown of the first movement and highlight all the important things that you should work on for this piece.
Back to Blog
 As many students begin to prepare for the ABRSM Performance Grade examination, here is a quick summarized guide of all the important things you need to know before recording your performance. The Essentials to know before your recordingFrom 9th March 2023 onwards. 1. Prepare 4 pieces
2. If you are under 18, please have a responsible adult present (note that he/she should not be in the video) for the recording of your performance to assist in the following:
3. Prepare a recording device and phone/camera stand if needed:
4. Test and trial the entire recording on your chosen device:
5. Prepare a hard-copy music sheet of the fourth piece/your own choice pieces 6. Photo ID
 Steps on what to do during your recording:1. Announce the following information to the camera:
2. Show your own choice/fourth piece of music score to the camera for 5 seconds 3. Show your photo ID to the camera - Candidate must show this themselves 4. Play all your pieces confidently 5. At the end, do look at the camera and say, “Thank you!” Finally, before uploading your video, do check the video to ensure both video and audio are working clearly. The file name must not contain any spaces or be blank. All the best for your examination and remember to practice hard! Other useful links from ABRSM:
Back to Blog
 The ukulele is said to be like a mini guitar, and they are both very popular instruments that many would like to learn. It may be difficult to decide between a ukulele and a guitar. As such, we have curated this article for you to find out more about each of the instruments. Let’s dive into the similarities and differences between a ukulele and a guitar. (The guitar referred to in this article would be the acoustic guitar). How are they similar?Both the guitar and the ukulele are string instruments that produce a sound through natural amplification. This means that the sound of the instruments are produced when the string vibrates over the body of the instrument. They have a similar body shape with a fretboard, which is where you would place your fingers on to produce the different notes and sounds. As such , you may come across similar finger movements on the fretboard when playing most of the notes, chords and scales. How are they different?1. Size and Weight Size wise, the guitar is much larger than the ukulele, with the body of a guitar being roughly 50 percent larger than a ukulele. The ukulele comes in various sizes but the most common would be the soprano ukulele, which has a scale length (length of the vibrating string) of around 33 cm while the guitar has a scale length of around 61 to 66 cm. Weight wise, a guitar, on average, weighs around 1-3 kg, while a ukulele weighs only 0.2-0.8 kg. Based on the size and weight alone, the ukulele is definitely more convenient and portable to carry around. 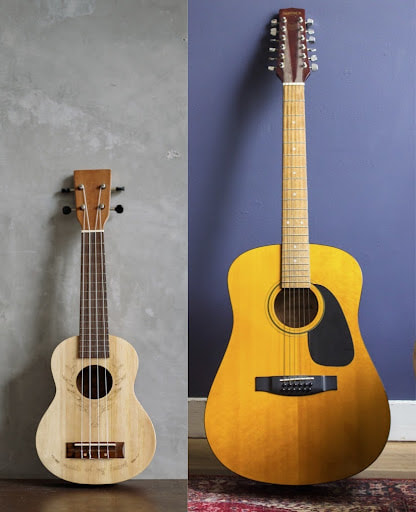 (From Left: Ukulele, Guitar - Acoustic) 2. Strings and Frets The guitar has 6 strings, with 18-20 frets (vertical metal strips on the fretboard), that can play a range of up to 3 octaves. On the other hand, the ukulele has 4 strings, with 12-15 frets and can play a 2 octave range. Therefore, we can definitely play a wider range of notes, chords and scales on the guitar as compared to the ukulele. The guitar is made of steel strings and has a wider neck, while the ukulele is made of soft nylon strings with a narrow neck. As such, it is much easier to press on the strings of a ukulele as you would feel less string tension under your fingers. Although the guitar strings might be slightly challenging to press on, the playing and strumming on the guitar would sound comparably louder and fuller due to the steel strings and the broader range of notes. Nevertheless, the level of comfort of your fingers on each of these instruments vary from person to person, depending on the size of your fingers and hands. Someone with bigger hands might in fact find the ukulele more difficult to play on due to its small body and narrow neck structure. 3. Sound The ukulele produces a bright, gentle, and light sound, and it also has a soft tone as the ukulele’s body is much smaller than that of the guitar. However, the ukulele might lack some depth in sound as compared to the guitar which has a much richer and fuller sound. (Watch this video to listen to the differences). 4. Technicalities The strings are tuned differently for the ukulele and guitar. The standard tuning for the strings of the guitar are E2 – A2 – D3 – G3 – B3 – E4, while the soprano ukulele is tuned at G4 – C4 –E4 – A4. Although both instruments are tuned differently, the relative position of the notes are about the same. Thus, many finger movements and chords are closely similar when playing the guitar and ukulele. Of course, it is likely that the chords are easier to play on the ukulele because the same chord that requires 2 or 3 fingers to be pressed down on the guitar might only require 1 finger when on the ukulele. Strumming on the ukulele is also much easier as compared to the guitar as it is easier to use your fingertips on the soft strings of the ukulele. You may also use your fingertips to play on the guitar’s steel strings but it would take some practice and getting used to, in order to get the right tone. Thus, it is easier to get the technique of strumming right on a ukulele while a guitar might require some time. We have summarized the various similarities and differences between a ukulele and a guitar into a table and a short video demonstration below. Do take a look! 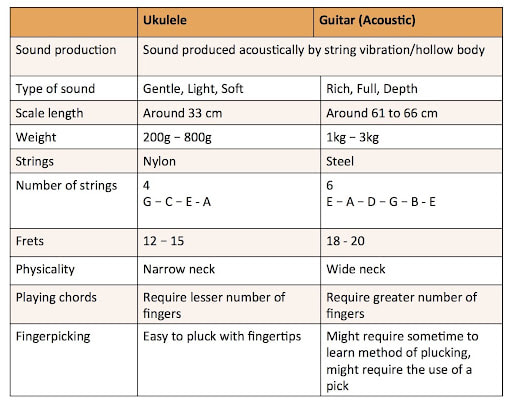 ConclusionTechnically speaking, the ukulele may be an easier instrument to learn due to its softer strings and smaller size. As such, the ukulele would be easier for younger children as it is more comfortable and less of a stretch on their fingers. However, for the older children and adults, it would really depend on what style of music you would like to play or the sound and tone that you would prefer. Some might choose the guitar over the ukulele due to its wider range of tones and functions, ultimately being able to learn a wider range of musical styles.
Back to Blog
 It is increasingly common for parents to send their children for music lessons at a young age and children often do enjoy learning a new instrument. However, as children grow older and have less time on their hands, some parents face the dilemma of whether or not to cease music lessons for their child. If you are currently facing this dilemma, do not hesitate further to let your child continue his or her music lessons as there are tremendous benefits for you to do so!  At Learn 2 Play Music Academy, we have students who have persevered and progressed through multiple stages of learning from the beginner to advanced stages, and who have emerged as successful learners. Our students, Adeline Tan (age 18) and Amanda Tan (age 16) have recently completed their Grade 8 Piano syllabus, with Adeline attaining a Merit in her Performance Grade exam. We invited their parents to share how both of their daughters have benefited from learning the piano, from a beginner all the way to Grade 8. It is a tremendous achievement, and we applaud the girls for their passion and resilience.  Why should a child start music lessons at a young age?Music lessons have been widely proven to aid with the development of the brain, and learning an instrument at a young age has been scientifically proven to aid in their motor skills, speech proficiency, and problem solving skills. All of these are abilities that children will certainly need as they enter into adulthood, and it is important for these abilities to be nurtured at an early age. It has been proven by a Harvard based study that children who have learned music for 3 years or more excel better than their peers in areas such as fine motor skills, auditory skills and response. Adeline’s and Amanda’s parents both strongly agree with the benefits of musical training at a young age. She mentioned, “Learning piano at a young age helped them (Amanda and Adeline) to improve their finger coordination and notes reading. They breeze effortlessly on picking up new instruments like the ukulele, flute and clarinet as CCAs in school. Adeline has great passion in singing and Amanda shows interest in art and painting. I believed this was largely due to their early exposure to music.”  How do we sustain a child’s interest in music lessons?As a child learns more advanced skills on the instrument, it is important for parents to keep the child engaged throughout the learning process. Parents can create a motivational and encouraging environment and mindset so that the child can approach learning positively. It is also recommended not to pressure the child with high expectations or demands such as attaining a certain grade by a certain time. Such a method is effective, as advised by Adeline and Amanda’s parents: “Looking back, there are times where they feel like giving up. It is perfectly normal to start off slower, and do have a realistic expectation of your child’s progress. Encouragement without giving them pressure is all they need. They will gradually be where they are. Piano has definitely taught my girls the value of hard work, perseverance and endurances.”  How does Learn 2 Play Music Academy encourage their students on their musical journey? The parents of Adeline and Amanda testify for Learn 2 Play Music Academy: “Their piano lessons are never boring. Every teacher in the school has been a positive influence for them. Special thanks to their teacher Emiline, her kindness, patience and passion in piano are above and beyond! Her experiences have driven my girls to pursue their love for piano and they are full of praise when they speak about her. The tools she has given them are top notch, and we thank her for being such an incredible and humble teacher…The school truly embraces my children and transforms them into successful learners. With heartfelt gratitude, I would definitely recommend Learn 2 Play Music Academy, a music school that excels and has exceeded expectations.”
Learn 2 Play Music Academy creates a positive and supportive learning environment for students to learn and we have a team of competent teachers dedicated to providing the best learning methods for your child. If you are interested in learning music in a supportive and inspiring environment, do contact us right here!
Back to Blog
The recent suspension of in-person lessons in Singapore is a stark reminder that the worldwide pandemic is an ongoing threat and that online learning will become a part of our daily lives. While we are unable to control the circumstances, it is a perfect time for us to stay optimistic and learn to adapt to learning online! If you are a parent facing difficulties with online music lessons, do not be discouraged as there are proactive steps that you can take to lighten your burdens, and make online learning more effective for your child. Read on this guide to find out more! 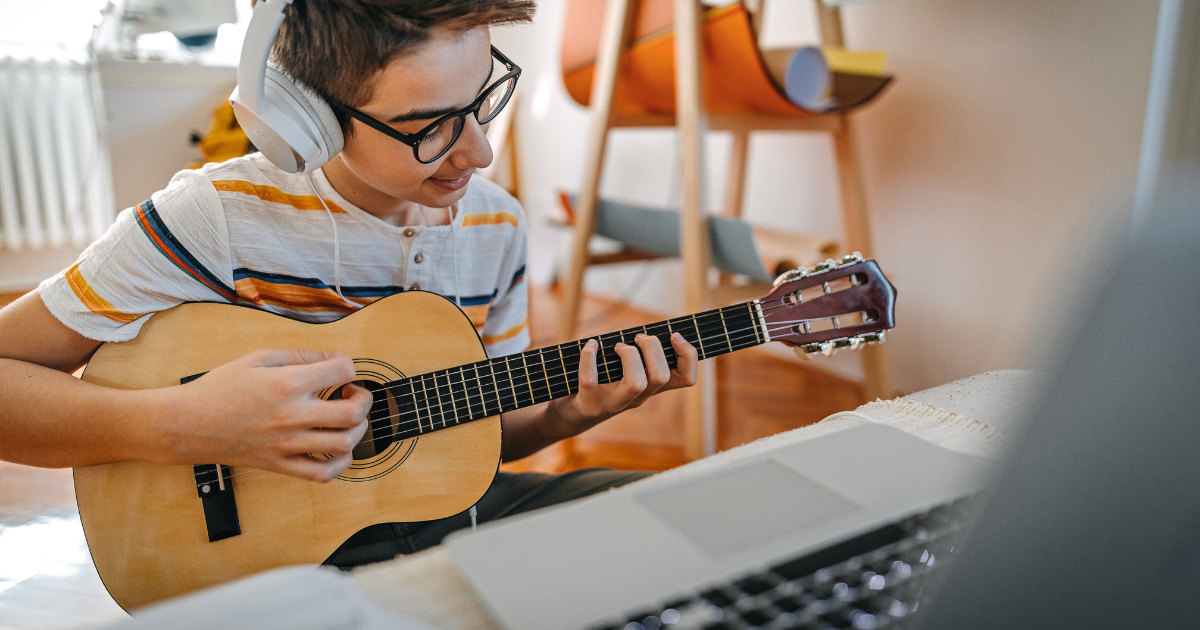 Step 1: Create a conducive spaceThe first step to help your child have an effective online lesson is to create a conducive, designated learning space for him or her. Having a quiet space that is free from all distractions is extremely important and can have a direct impact on your child’s attention span. A neat and quiet learning environment can entail tremendous positive effects on a child’s behavior, emotions and intellect. This space should be a designated space where a child goes to class every week. In this way, your child will learn to manage their behaviour and remember that they should behave themselves like in an actual class setting, whenever they enter this space. For students learning the piano, it is understandable that the online lesson has to be held in the living room as the piano is situated there. If this is the case, parents should inform other family members in advance that there will be a lesson going on during a certain time, and parents should also instruct other siblings to stay in another area of the house during the lesson. This will reduce unnecessary distractions for the learner. The piano top should also be free from clutter and parents should refrain from placing things on the piano. Research has proven that physical clutter can cause children to have a higher tendency to procrastinate. For younger children, it will be extremely helpful if parents can sit with their child during the lesson. A parent’s presence can provide a supportive and encouraging environment for a young child and this will make an online lesson much more effective. Step 2: Prepare with the right setup and toolsHaving the right tools and equipment set up for your child’s online music lesson can ensure that the lesson is set for success. The first thing you will need to prepare would be a reliable device for use. It is recommended for you to use a desktop, laptop or tablet as it will be easier for your child to look at a bigger screen if the teacher is explaining a hand position or showing certain parts of the music score. However, a phone is also usable but do make sure that it is positioned in such a way that your child can see the screen clearly. Another thing to do is to ensure that your device is set up at the right angle, such that the teacher will be able to see the student’s fingers, and also such that the student will be able to see the screen clearly. The desktop, laptop or tablet should be placed on a table at a height where the device’s camera can capture the student’s fingers and posture, as well as the instrument. If you are using a phone, you should also get an adjustable phone tripod, which will help you to position the phone at a good height and angle. The right positioning of the device can make a significant difference to ensure the lesson is an effective one. If your child is learning the piano, it is extremely important to position the phone at the right angle so that the teacher can see your child’s fingers and face in the same view. You can do this by positioning the device at a height slightly higher than the piano keys, and the device should be tilted slightly downwards so that the camera can capture the fingers. Refer to the pictures below to see how the captured view should look like. Recommended camera views for piano lessons 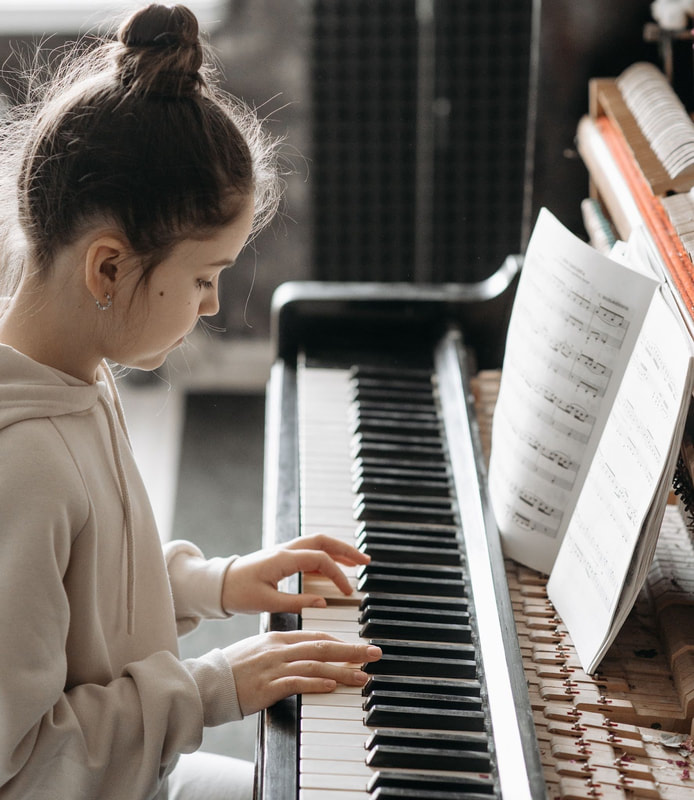 Picture 1: Portrait camera view 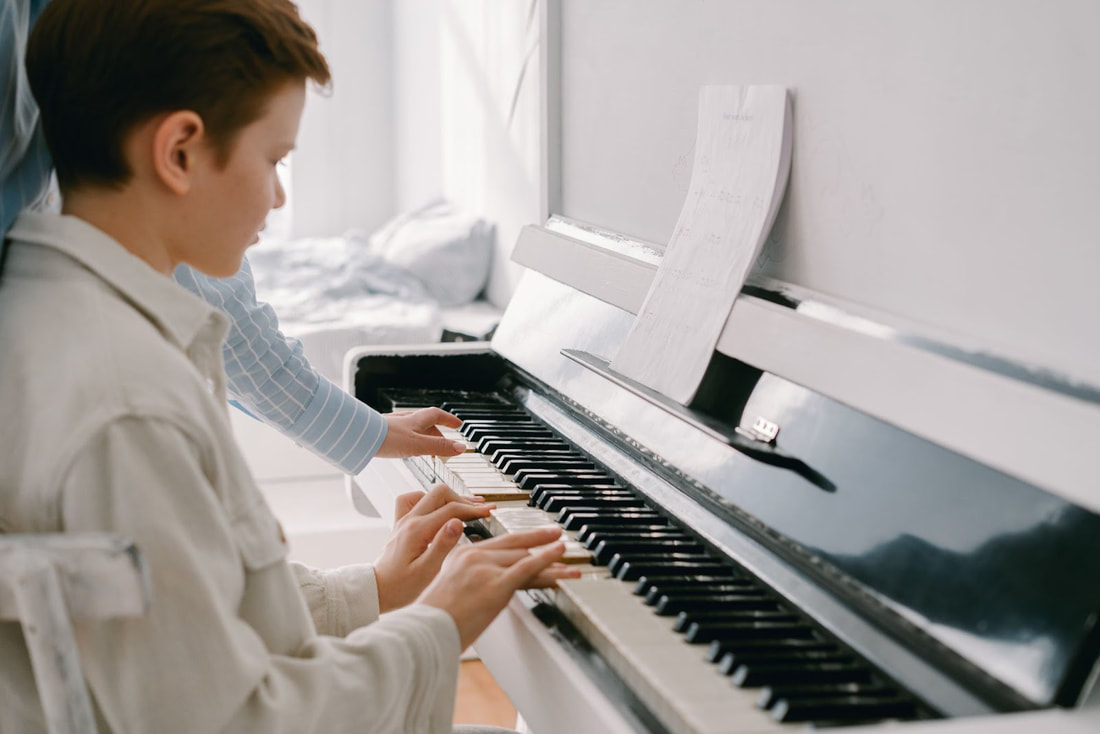 Picture 2: Landscape camera viewLastly, it is strongly recommended for a student to use earphones or headphones with internal microphones during the lesson as this will help the student hear and communicate with better sound quality. Step 3: Check the sound qualityTo ensure that the teacher can hear the sound from the student’s instrument clearly, you should “Enable Original Sound’ under the audio settings of your Zoom account. You can read more on how to do this here. Do ensure that you also uncheck “Automatically adjust microphone volume” in your audio settings. These settings will allow the raw original audio to pass through and remove any audio enhancement automated by Zoom. The audio enhancement automated by Zoom is targeted to improve the sound quality of voices but it often distorts an instrument’s original sound. After you adjust these settings, be sure to use earphones or headphones as the use of speakers might create unnecessary echo. If you are unable to adjust the above settings, you may play the instrument one to two metres away from the device in order to prevent any sound distortion on the other end. Sound usually gets distorted when you play the instrument too close to the microphone in the device. This is because a device’s microphone is originally designed for speech, which is softer than the sound from an instrument. Step 4: Set a schedule for your childIt will be incredibly useful if you can help your child with creating a timetable that includes weekly lesson and practice timings, along with tangible goals. This process is best done together with your child as your child will then learn to be involved in planning and gradually learn to manage their own time. A timetable will help to remind your child of their lesson as it is easy to forget about lesson timings when lessons are held at home. Having regular practice will also help your child to progress quicker and reinforce what they have learned in the previous lesson. Step 5: Carry a positive attitude!A child may tend to rely more on their parents for positive encouragement during times when they are stuck at home. Thus, parents can help to create a supportive environment by giving their children constant positive motivation and by carrying an optimistic attitude towards online lessons. Do remember that adjusting to online learning takes time and do not give up if the first online lesson does not meet your expectations. Trying it out a few times with your child will definitely break barriers and taking the time to familiarize will make things easier. Finally, don’t forget that music can serve as a fun and relaxing outlet for children in challenging times!
We hope that the 5 steps above can help you to make online lessons more effective for your child. When you have all the right tools, it is definitely much easier for children to be engaged in online lessons as well. If you are interested in trying out online lessons, you can also get in touch with us here!
Back to Blog
Are you hitting the gym or working out? Check out our Spotify workout playlists below.
We have selected our top 31 favourite workout songs that make us feel energized! It's so much easier when you have good music to keep you going. Try it and see if it works for you. :D English Pop SongsK-pop Songs
Back to Blog
Buying your first violin?6/1/2021  Are you or your child interested in learning the violin? Are you looking to buy a violin but aren’t sure which one to buy? Fret not, this guide will tell you all the things you need to know about buying and choosing the right violin. The violin is a delicate instrument, with a beautiful sound that is attributed to the material and structure of a violin. There are varied qualities to choose from so it is important to have basic knowledge of the structure of a violin. The following guide will provide you with information on what to look out for when choosing a violin. What is the structure of the violin body?The violin is made up of different parts that are attached onto its wooden body. It is important to check that your violin has the following parts to it, as shown in this picture. 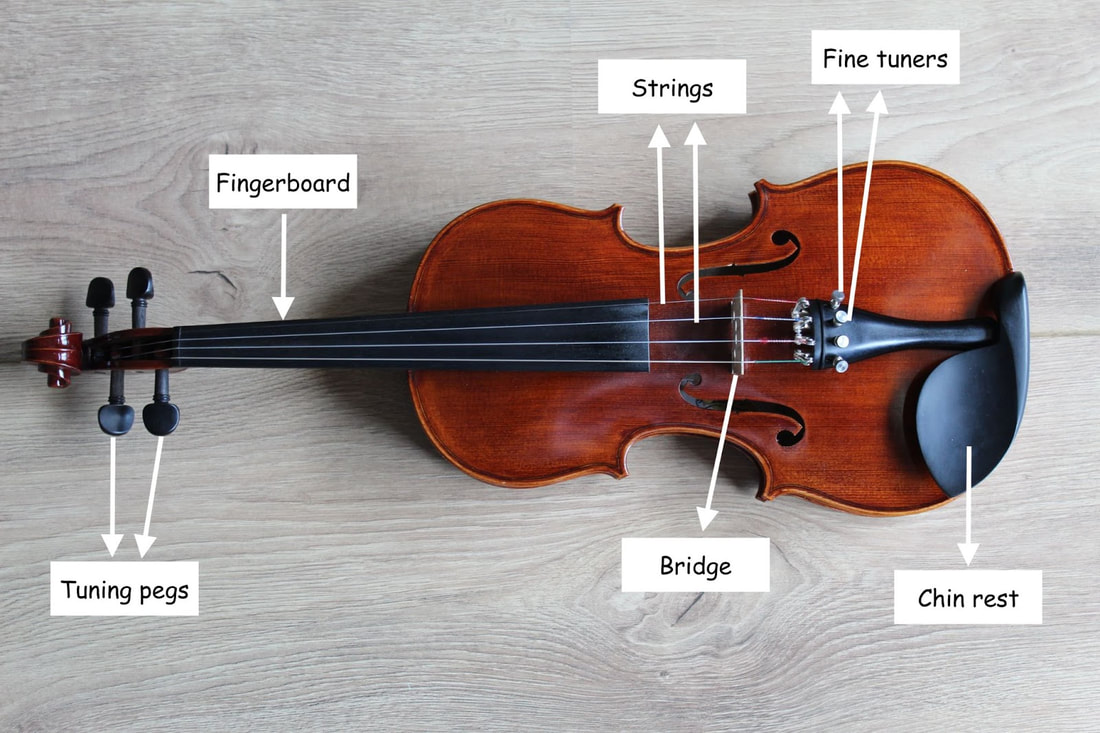 (Photo by Lucia Macedo on Unsplash) Strings: The violin has 4 strings arranged in an order from the thickest to the thinnest. Bridge: The bridge holds up the 4 strings and allows you to cross from one string to another easily. Tuning pegs: There are 4 tuning pegs, one for each string, and they should be able to turn smoothly as they are used to keep the violin in tune. Fine tuners: The 4 fine tuners have the same function as the tuning pegs but they are designed to make it easier for players to tune their strings. Hence, the fine tuners are not mandatory for the violin but they are usually required for beginner players. Fingerboard: This is where you will place your fingers to press on different notes. Chin rest: This is where you place your chin to hold the violin with your neck. What accessories do I need to purchase besides the violin body itself?Besides the violin body, there are some accessories you need in preparation for your first violin lesson. 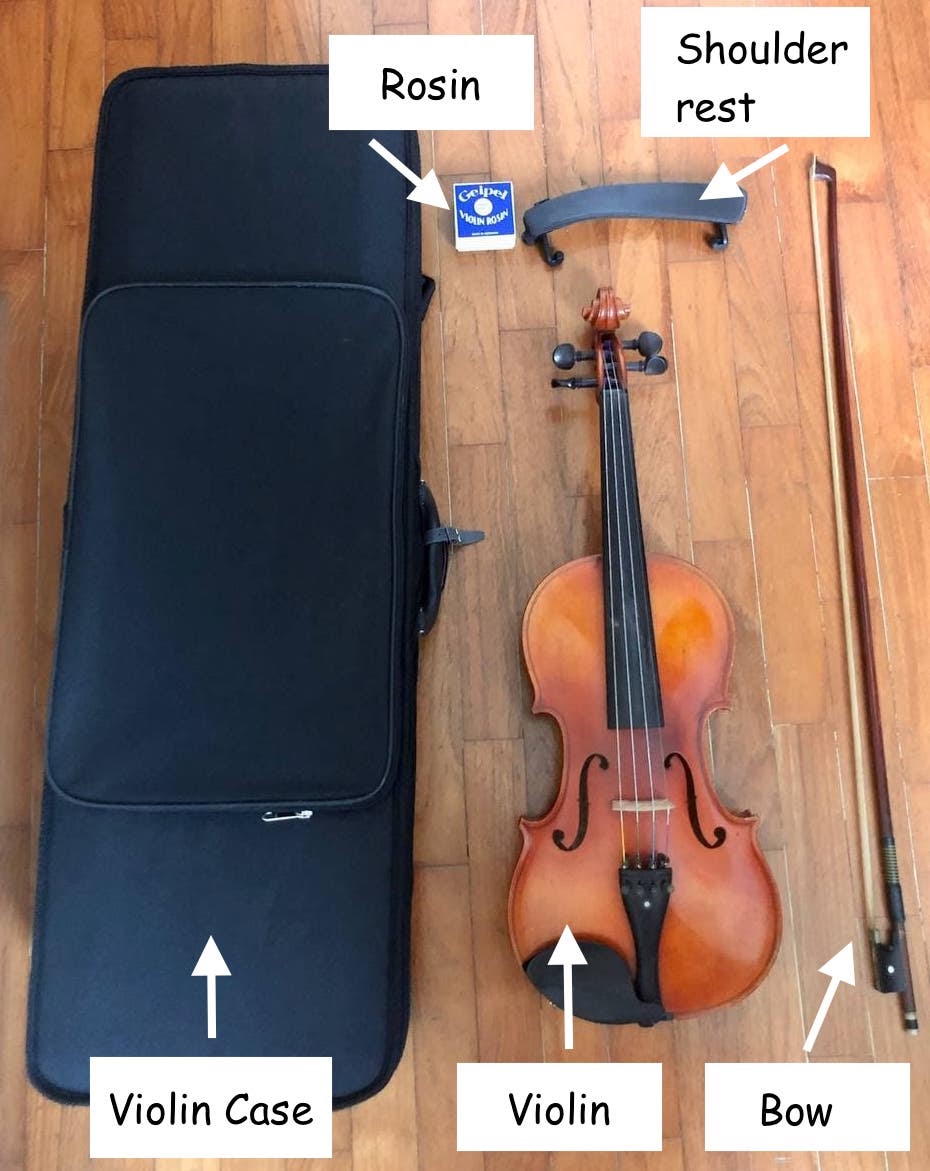 1. Bow The most important item is the violin bow. The bow is a wooden stick with horsehair and it is used to create sounds upon contact with the violin strings. You need the bow to play beautiful sounds on the violin. 2. Rosin The next item of great importance is the rosin. A rosin is made from the sap of pine trees and you will need to rub the rosin onto the bow hair before the bow is used to play the violin. Without the rosin, there is no friction to help the bow make a good sound on the violin strings. 3. Shoulder rest A shoulder rest is an accessory attached to the back of the violin. It provides a comfortable cushion for your shoulder and collarbone when you hold onto your violin with your neck. It also provides stability for players as it stops the violin from slipping off your neck. 4. Violin case You will need a violin case to store your violin and when you bring it for your lessons. You should also store your violin in the violin case when it is not in use in order to protect it from potential damage. How do I choose the right violin size?Violins come in various sizes. Adults will tend to use the standard size violin, also known as the full size or 4/4 size violin. For children, there is a range of violin sizes to choose from, such as the 3/4 size, 1/2 size, 1/4 size etc. It is very important to choose a violin of the right size as this will affect the level of comfort you have with the instrument. If the violin is too heavy for a child, the child may experience discomfort at the neck, and may possibly lose motivation in playing. You can measure your child’s arm length to determine the right violin size. To measure the arm length, your child needs to extend his/her left arm outwards completely straight, and then take the measurement from the bottom of the neck to the middle of the palm. 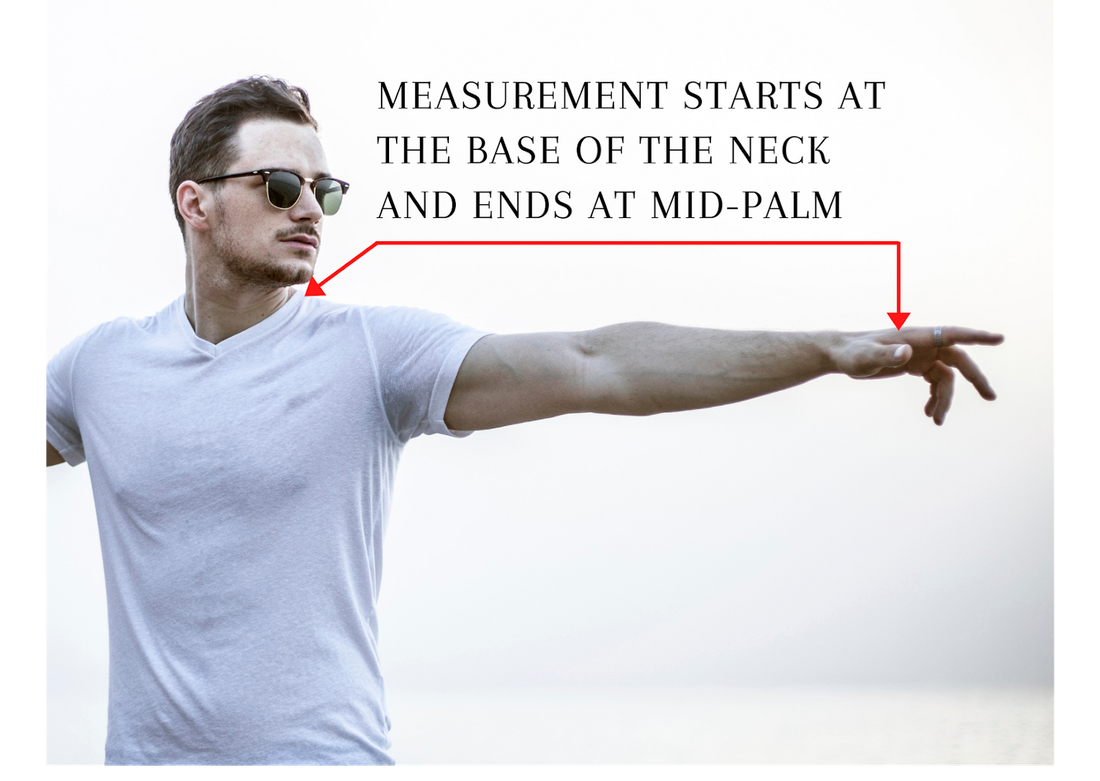 Once you have the measurement of your arm length, you can use this chart below to find out which violin size is the most appropriate for your child. 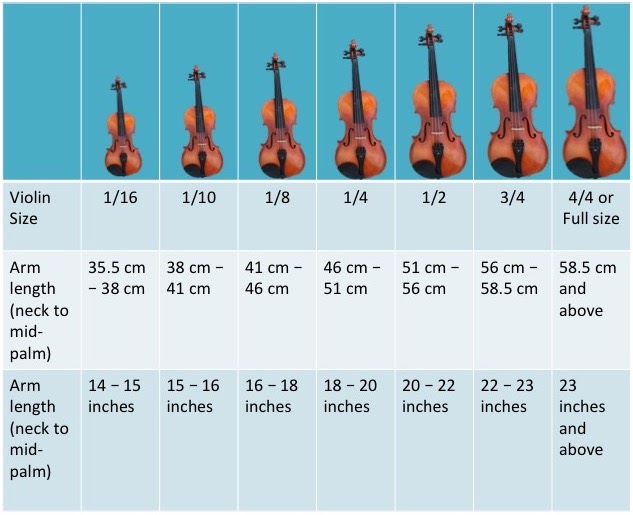 Lastly, it is important to note that violins, bows, shoulder rests and cases all come with matching sizes. A 1/4 size violin would require a 1/4 size bow to play with, a 1/4 size shoulder rest, and a ¼ size casing to store the violin in.
We hope that this guide will help you to make an informed decision in choosing the right violin for you or your child. If you are ready to purchase a violin, check out our package here. If you still have doubts on how to pick a violin, it is always best to consult your violin teacher for advice. If you do not have a violin teacher and are looking for violin lessons, Learn 2 Play Music Academy also offers violin lessons. Register for our complimentary trial class here!
Back to Blog
Are Online music lessons for me?4/3/2021 The prevalence of technology and the recent pandemic has opened many new opportunities for online music learning. In an increasingly globalized world where the use of technology is growing rapidly, some of our students have chosen to prioritize the flexibility of learning music through both online and physical forms.  Image in the middle: Louvré museum in France, Image on the right: Marina Bay front in Singapore (Source from FreePik) Catherine Pua, who started in-person guitar lessons for the initial 2-3 months at Learn 2 Play Music Academy, had to switch to online lessons due to her work commitment in France. We have invited her to share with us her learning experience at our school, “I had to travel to France and be away from Singapore for 4 months, but I did not want to miss any lessons during this period. The school was really flexible in arranging and ensuring that this virtual learning could take place despite the 7 hours of time difference between Singapore and France. I must also give credit to the guitar teacher who not only enabled meaningful learning to take place, but he has also challenged me intellectually to always go the extra mile after each lesson to improve on new techniques and knowledge. This remains an important aspect in sustaining my interest in the guitar and in music.” Although Catherine was in France, she was able to learn the guitar from one of our teachers at Learn 2 Play Music Academy, who taught from Singapore through online platforms. What exactly is online learning?Online learning involves the use of digital platforms to enable students to attend lessons remotely through the use of the internet. In the context of a music lesson, teachers will conduct lessons through a video conferencing application. How is this different from traditional learning?Traditional learning is in-person learning where it involves the physical face-to-face interaction between the teacher and the student. What is hybrid learning?Hybrid learning is a mixture of in-person and online learning but it occurs when online lessons are used to replace some face-to-face classes. The purpose of hybrid learning is to accommodate students who may be living in a different location and are unable to attend classes physically for a temporary period of time.  Image from FreePik What are the benefits of online music learning?Convenience Attending music lessons online will save you the time and hassle of travelling. Online music lessons are especially helpful for students who might need to travel to another country or a further location temporarily. Comfort Having a lesson in the comfort of your own home will give you the flexibility of finding the most suitable environment where you can learn with maximum productivity. Attending lessons from home will also give you additional time to prepare and warm up before the lesson begins. More effective learning Online lessons will give you the flexibility to practice immediately after the lesson has ended. This will encourage more effective learning as you will be able to promptly apply what you have learned during your lesson. What are the drawbacks of online music lessons?During an online lesson, your teacher cannot physically assist you to adjust your fingers to correct your technique on the instrument. Hence, you have to be very focused and attentive during your lessons. Online lessons can also be disruptive if you shift your focus to do other things on your device during your lesson. “Face-to-face lessons will encounter lesser external interference when a student is facing the instructor. With online lessons, I am sometimes tempted to read and reply to some emails that come in during the lesson,” Catherine added. There may also be distractions at your home that could hinder your ability to concentrate. What should I consider before signing up for online music lessons?To join an online music lesson, you will need a location with a good internet connection to ensure clear communication with your teacher. In addition, you will need a device with a working camera and microphone, and this could be your computer or smartphone. Furthermore, it is important that the device you are using enables your teacher to be able to see and hear you play on your instrument clearly. How do I sign up for online/hybrid music lessons?Learn 2 Play Music Academy welcomes passionate and enthusiastic students like Catherine, who embraces life with a positive and courageous mentality. “Live life, love life, have a passion for learning, and take the time to hone and perfect skills,” she said.
About 8 years ago, Catherine also overcame the fear of water, and she now enjoys swimming in both breaststroke and in free-style. Catherine also learned French and wrote a thesis in French for her Masters Degree in Sociology. Catherine has shared some of her thoughts about our school. “I will definitely recommend the school to anyone who wants to pick up the guitar, at any stage of learning and at any age,” she said. So, what are you waiting for? If you are interested in exploring your learning styles, you can register your interest with us here right away!
Back to Blog
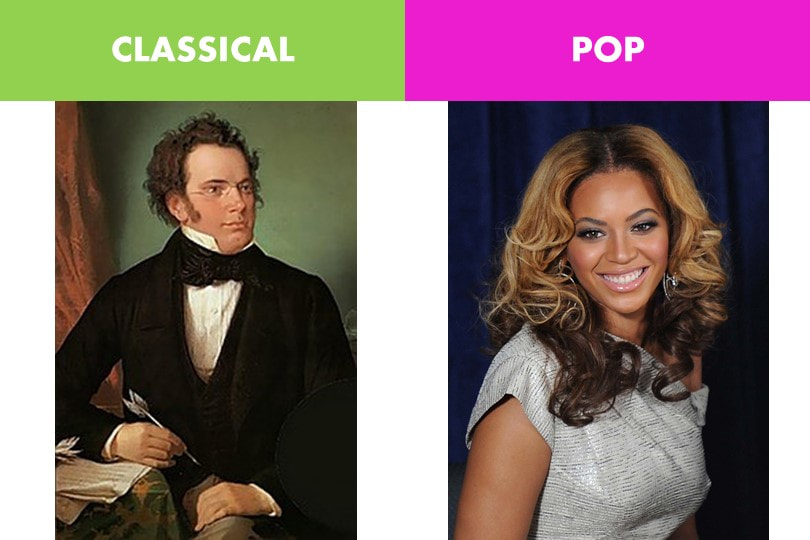 Image on the left: Franz Schubert, image on the right: Beyonce Classical music is widely known as the “golden age of music” as various significant music forms were created during this era such as the concerto, symphony and orchestra. Composers who dominated the classical era during the 18th and 19th centuries include musical geniuses like Mozart, Haydn, Beethoven, and Schubert. Classical music can be defined as traditional structured music that follows established principles of composition. Classical music may seem boring and dull to some, but it actually forms the foundation of the composition and style of modern day pop music. Thus, learning classical music will give you a greater understanding of pop music compositions. In what ways has classical music influenced pop music?1. Form and Structure 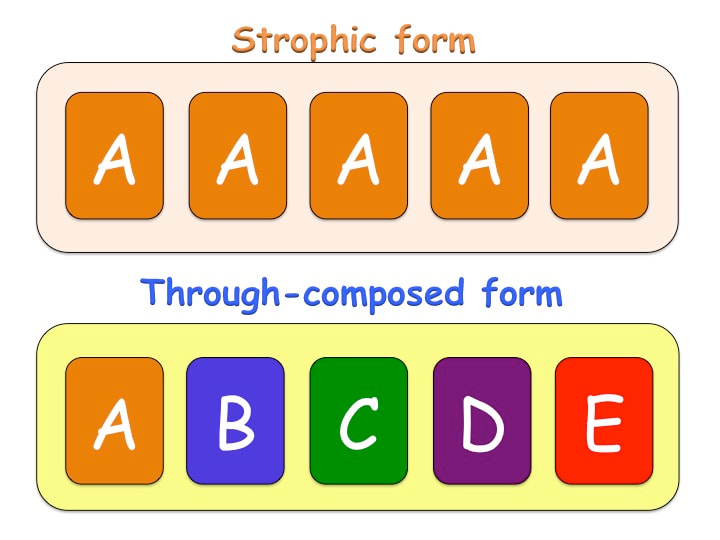 The form and structure of a pop song originates from Franz Schubert’s very first German art song, the Lied. The Lied is a song written for one voice with a piano accompaniment that is characterized by themes of love and nature. Schubert was a remarkable composer who wrote over 600 songs with tender melodies that were intimate and emotional. For the most part, Schubert’s songs can be categorized into 2 types of song structure. The first structure would be the strophic form where the same melody is repeated for each verse, while the latter structure would be the through-composed form which has a different melody for each verse. These structures establish the structure of pop music, primarily consisting of 2 sections - the verse and chorus, which has a different melody for each section. 2. Harmony and chords Pop music is also characterized by a diatonic harmony which originated from Classical music. A diatonic harmony means that the chords of a song are built from the seven tones of the major and minor scale. Most of the pop songs are based on these seven tones chords, which is a significant characterization of Classical music as well. Mozart’s famous piece ‘Eine Kleine Nachtmusik’ (A little night music) in G major, revolves around these diatonic chords of G, D, Em, C and A. On a similar note, Ed Sheeran’s ‘Lego house’ in G major shares very similar chord progressions, mainly the 4 chords of G, D, Em and C. Thus, we can see that classical music had a notable influence on the fabrication of pop songs. Listen to Mozart’s ‘Eine Kleine Nachtmusik’ (A little night music) Listen to Ed Sheeran’s ‘Lego House 3. Rhythmic regularity Pop music flaunts a strong rhythm with a steady tempo that does not fluctuate greatly, mostly staying the same throughout the entire song. This characteristic can be traced back to classical music where the melodies and harmonies are both driven by steady beats and a steady meter. 4. Examples Here are some famous pop songs that have notable influences from Classical composers: Listen to ‘Because’ by The Beatles The Beatles composed ‘Because’ by playing the chords of Beethoven’s Moonlight Sonata backwards. Listen to ‘Ave Maria’ by Beyonce Beyonce re-composed Schubert’s song ‘Ave Maria’ into her own pop edition: |